RSS

Blog

LEARN and CREATE – the flat herringbone weave made easy - part 2

CONTINUATION: flat herringbone weave

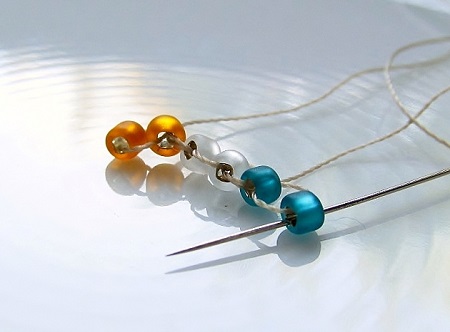
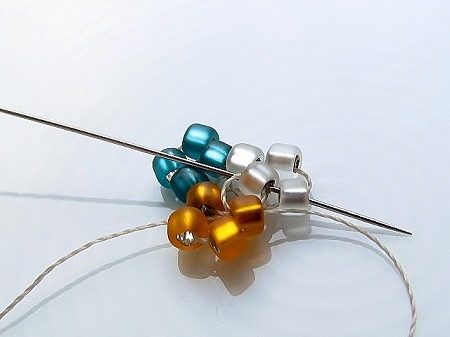
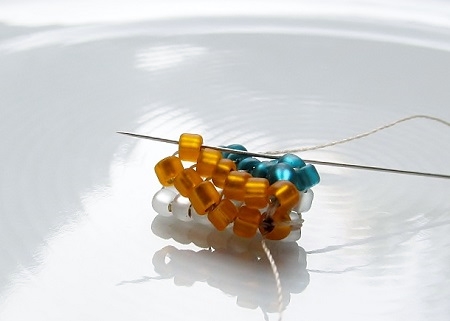
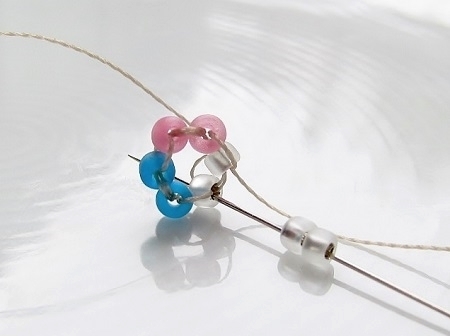
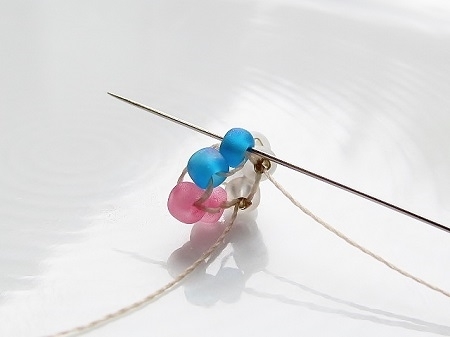
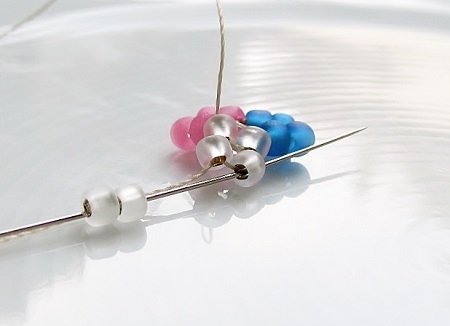
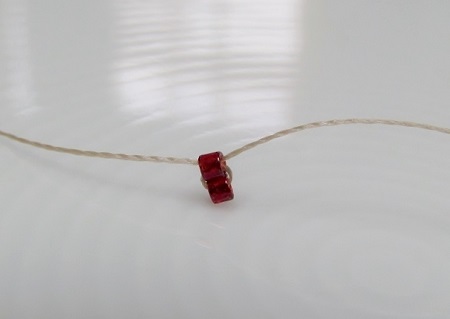
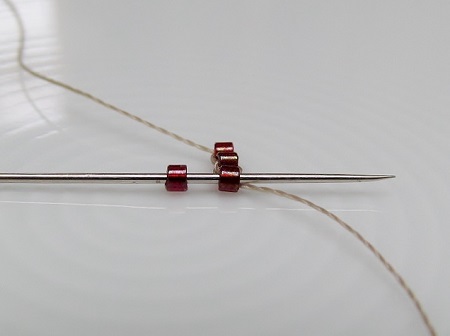
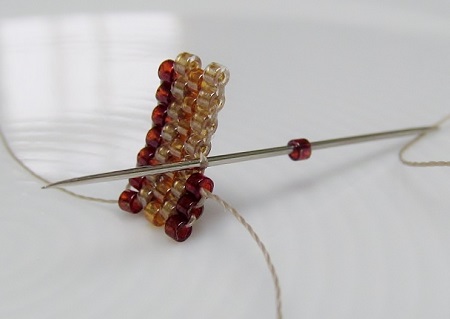
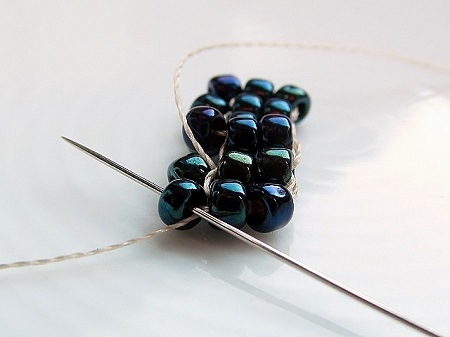
  • *to get in position for the next round and all the other rounds, make a zig-zag movement:
  • go UP through the bottom of the previous bead on the same level

flat herringbone - next round - start zigzag movement

  • and go UP through the bottom of the end bead to end up at the top of the last bead

flat herringbone - zigzag movement - end position

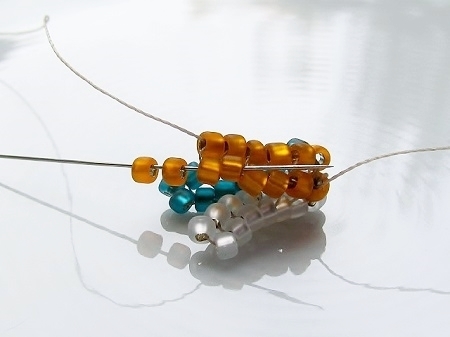
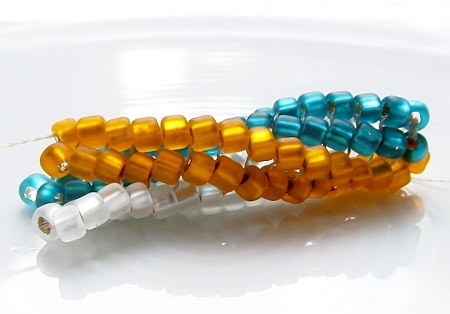
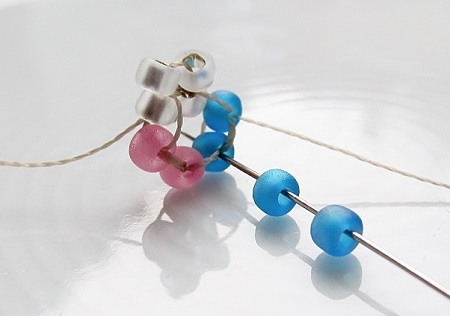
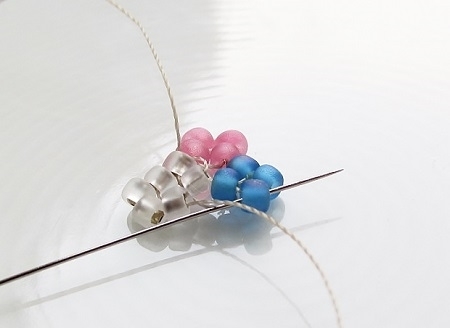
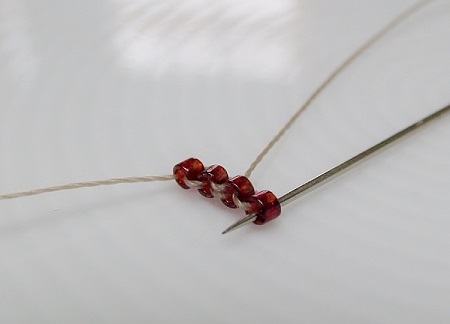
  • this method is recommended if you create a wide bracelet or if you like a simple effect without embellishments, but it has the disadvantage of straightening the beads at the ends
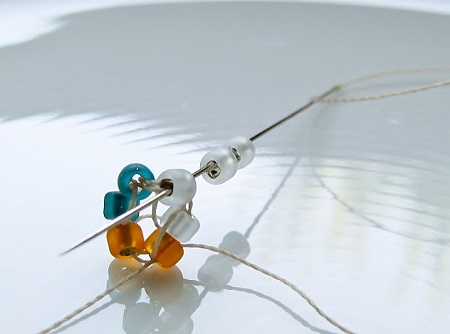
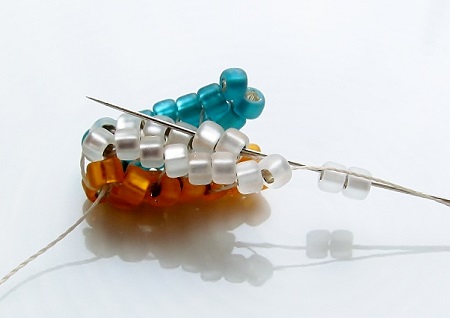
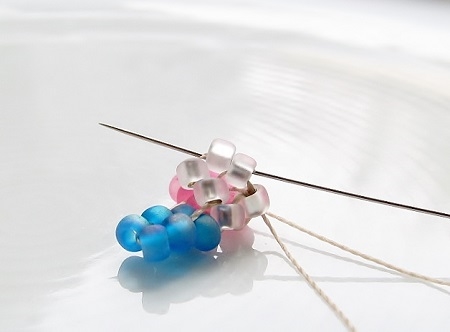
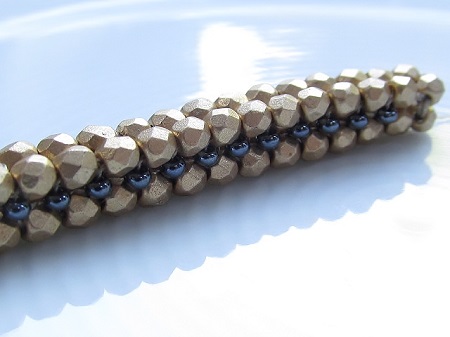
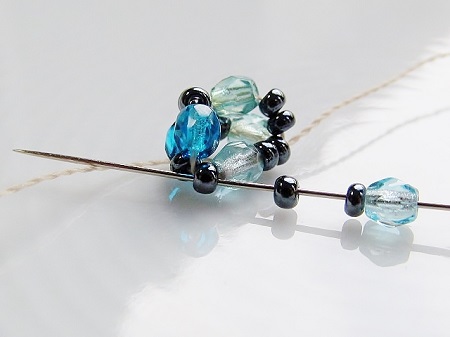
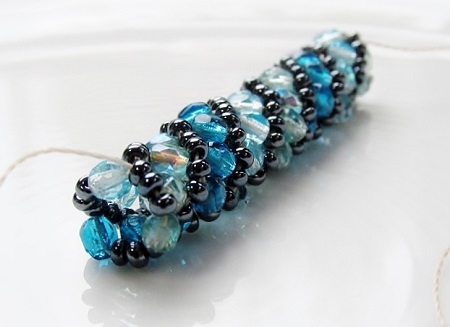
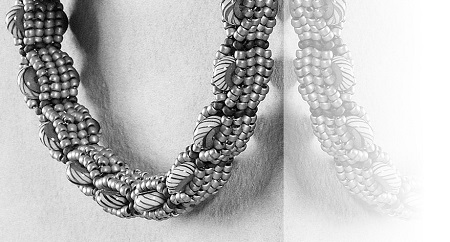
  • there is another way which keeps the V-shape of the beads, but which makes use of ornamentation. You can access the next row from the outside by adding a few beads in a smaller size. For instance, if you work with size 8 beads you could add a scalloped edge with 2 or 3 beads in size 11.

flat herringbone - scalloped edge

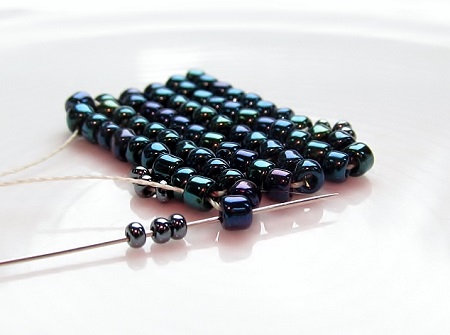
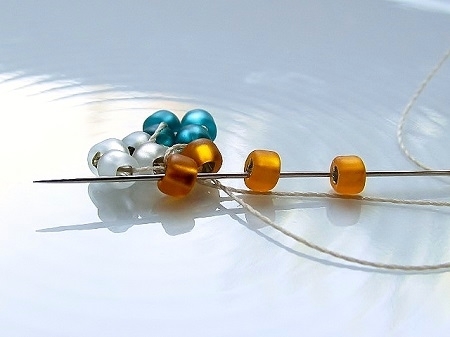
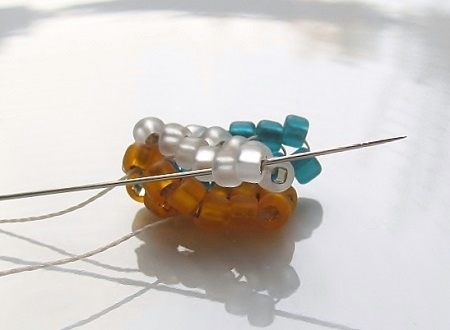
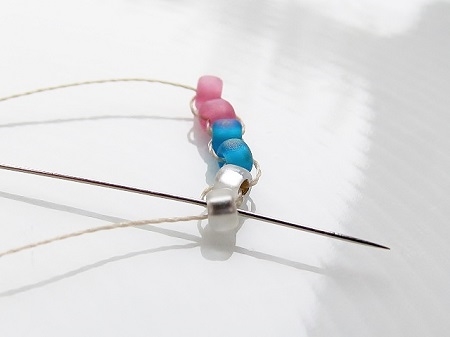
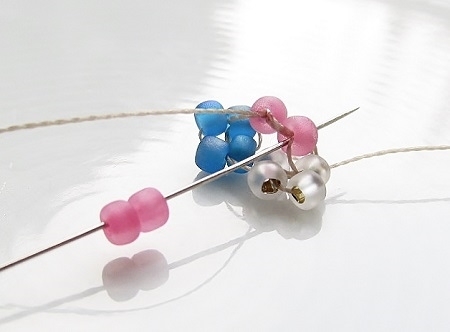
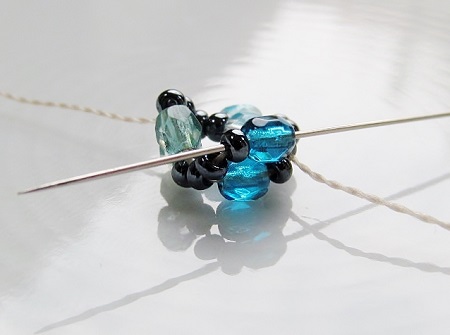
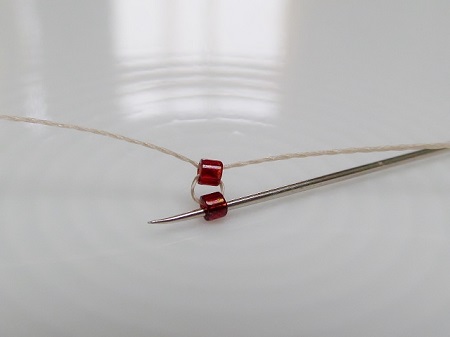
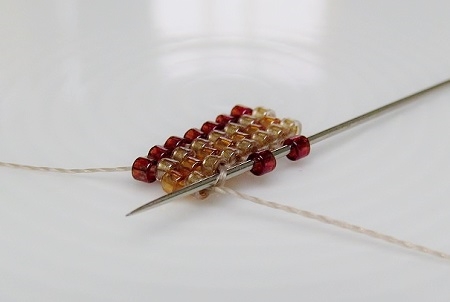
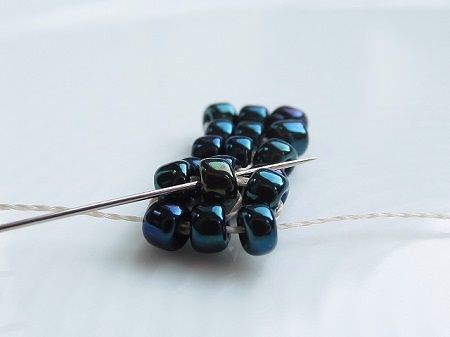
  • to start the following round : pick up 2 beads, go down 1 level through the 2nd bead and go up through the 3th one, pick up 2 beads and go down 1 level through the 4th bead, go up through the 5th bead, pick up 2 beads and go down 1 level through the last bead **
  • note: you go up and down one bead at a time
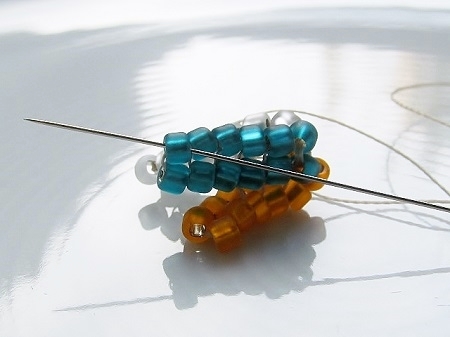
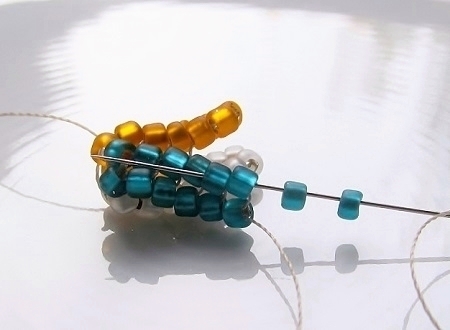
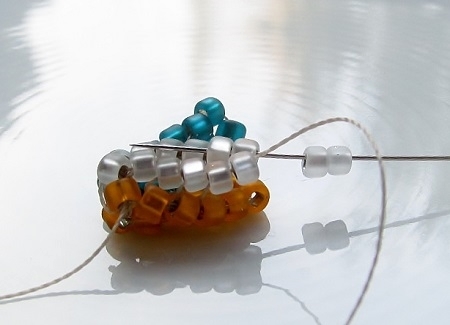
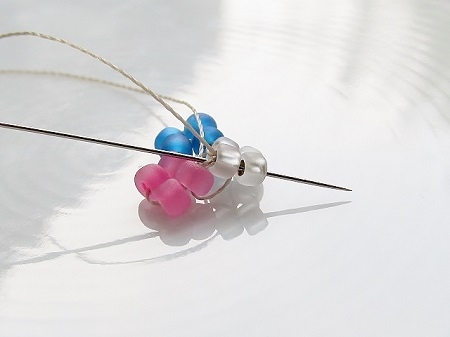
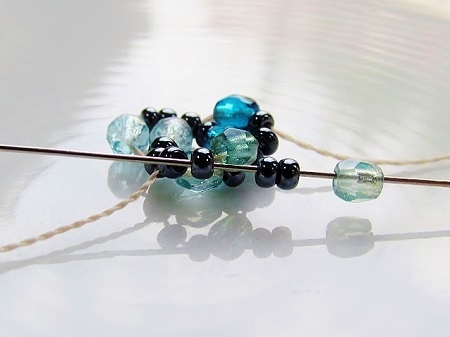
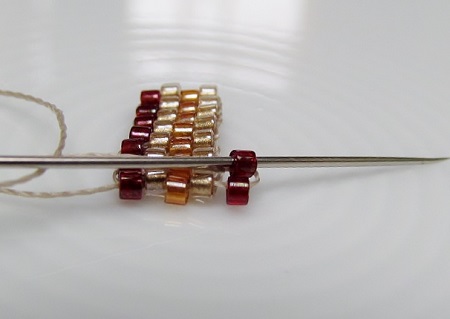
  • continue from* to** with the "end of row movement" of your choice till you reached the desired length
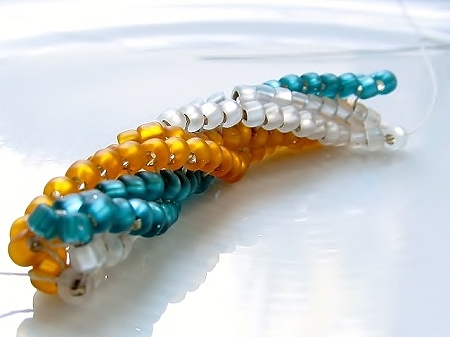
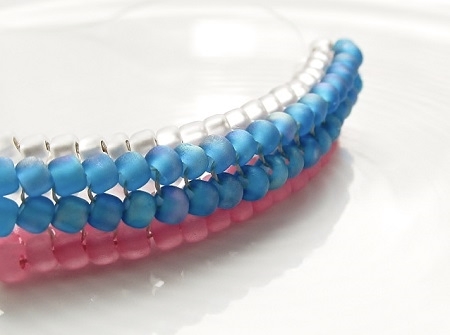
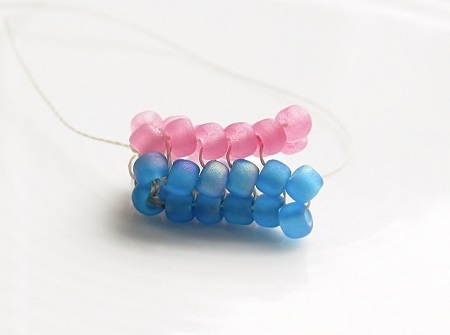
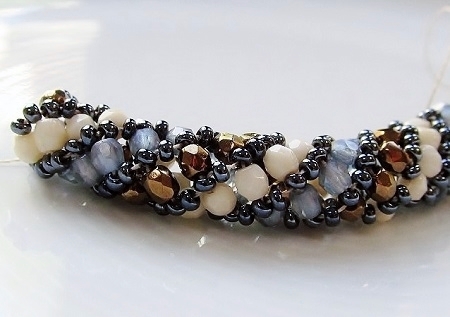
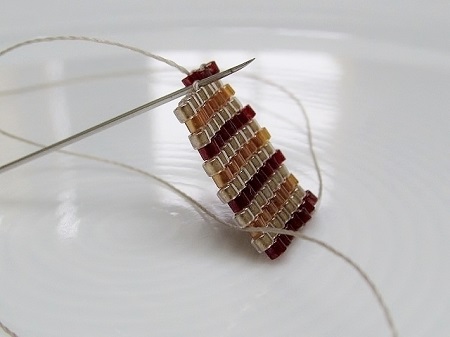
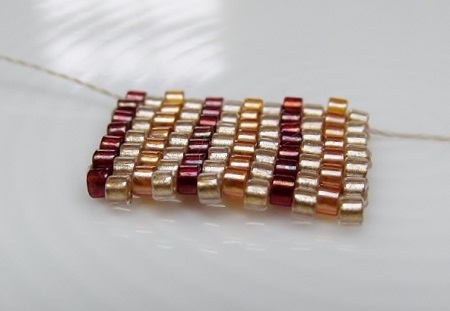
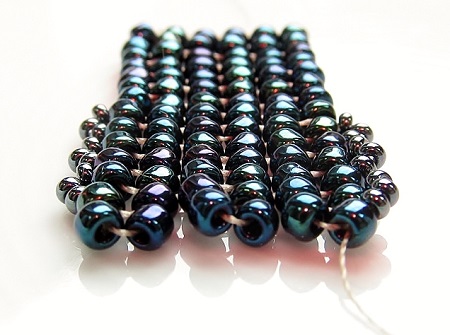
  • you will find out that the top of each column seems to separate from the other columns as the beads are attached at the bottom in the previous round. Consequently and in order to finish your piece, you stitch in circular movement through the beads of the last two rows in order to create a look similar to the two base rows in ladder stitch.

flat herringbone - columns

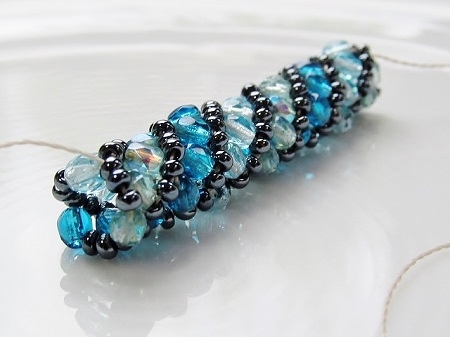
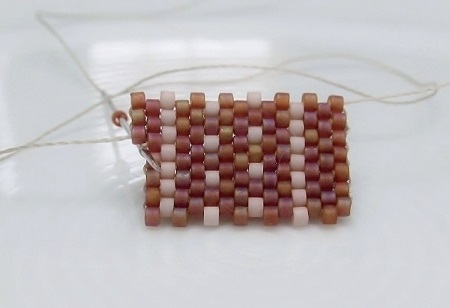
  • add a clasp and enjoy your bracelet

flat herringbone and glass discs


Tips:

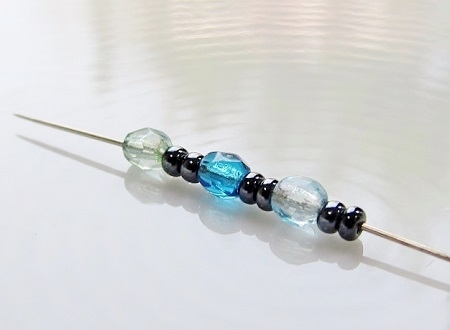
it is easy to integrate other stitches in between pieces of herringbone weave.

Thank you for choosing your beads and findings @ http://dunebeads.com/en/ !

Happy day, see you soon!

LEARN and CREATE – dance the twist again ... with the twisted tubular herringbone weave - part 1

The twisted tubular herringbone is a variation of the regular http://dunebeads.com/en/learn-and-create-the-tubular-herringbone-weave-on-a-base-of-ladder-stitch-part-1. It is the result of an imbalance created by a difference in level, which makes the columns bend.

Twisted herringbone stitch

Challenge:

In the step-up you have to pay special attention to the number of levels you are working on.

Supplies for the twisted herringbone stitch:

  • 8/0 beads or 3x3 mm fire-polished beads in 3 colors: color A, color B and color C
  • needle, thread and scissors
  • toggle and beading mat.

Weaving instructions for the twisted tubular herringbone stitch:

  • to start, create a base in ladder stitch in the following colors: 2x color A, 2x color B and 2x color C

Twisted herringbone - ladder stitch

Twisted herringbone - round 2, add beads in regular herringbone

  • pick up 2x color A and go DOWN through the top of the 2nd color A
  • go UP through the bottom of the 1st color B
  • pick up 2x color B and go DOWN through the top of the 2nd color B
  • go UP through the bottom of the 1st color C
  • pick up 2x color C and go DOWN through the top of the next bead in color C

Twisted herringbone - round 2, add color C in regular herringbone

  • in the third round starts the twisted weave: go UP through the 1st bead in color A of level 1 as well as the one of level 2

Twisted herringbone - round 3, make a step-up

  • pick up 2x color A and go two levels DOWN through the 2nd color A

Twisted herringbone - adding beads to step-up in color A

  • herein resides the difference between regular and twisted herringbone stitch
  • go UP through the 1st color B on the top level

Twisted herringbone - get in position to add color B

  • note: you go only ONE bead up

SEE - part 2

LEARN and CREATE – dance the twist again … with the twisted tubular herringbone weave - part 2

CONTINUATION : Twisted Herringbone Stitch

  • pick up 2x color B and go 2 levels DOWN through the 2nd color B

Twisted herringbone - add 2 beads in colors B

  • go UP through the 1st color C on the top level

Twisted herringbone - get ready to add color C

  • pick up 2x color C and go 2 levels DOWN through the 2nd color C

Twisted herringbone - adding color C

  • as a consequence, in each round you go 2 levels DOWN and 1 level UP
  • exception: to access the next round, the step-up demands each time that you go 2 levels UP in the 1st color A

Twisted herringbone - each step-up 2 beads up

  • ergo, in color A you always go 2 levels UP and 2 levels DOWN

Twisted herringbone - each step-up 2 beads down

  • to summarize: 2 levels UP in A, 2 levels DOWN in A, 1 level UP in B, 2 levels DOWN in B, 1 level UP in C, 2 levels DOWN in C and repeat
  • after a few rows, you will see how the spiral develops in the rope

Twisted herringbone - loose beads at end of columns

  • when reaching the desired length, attach the loose beads of the last row and finish the top with a big bead or a bead cap and a toggle
  • enjoy !

Hints :

You can create this twisted rope with:

  • smaller seed beads - 15/0, 13/0, 11/0 -
  • or with bigger beads such as 4x4 mm Czech beads
  • and even mix the sizes for a very different look.

Thank you for choosing your beads and findings @ https://dunebeads.com/en/shop !

Happy day, see you soon!

A analysis of Pantone for a colorful autumn and winter

Autumn colors are the latest trends ... but at Pantone they gave them their own touch ... with an unusual mix of deep, light and bright colors ... reminiscent of whirling autumn leaves (red and green hues) in the cold evening air ( blue and purple hues).

autumn night

Let us have a closer look at it:

from red to warm orange: 3 shades

  • a deep brown red (Red Pear),
  • a bright vermilion red (Valiant Poppy)
  • and a pronounced bright orange yellow (Russet Orange)

from yellow to green: 4 shades

  • a bright green yellow (Ceylon Yellow),
  • a light greenish yellow (Limelight),
  • a subdued medium moss green (Martini Olive) and
  • a rich blue-green (Quetzal Green)

from bright blue to soft purple: 3 shades

  • a bright Capri blue (Nebulas Blue),
  • a deep purple ultramarine (Ultra Violet) and
  • a light purple (Crocus Petal)

Fashion colors Fall 2018

and get your classics out of the closet with:

  • navy blue (Sargasso Sea),
  • creamy greyish white (Tofu),
  • light silver gray (Quiet Gray) and
  • soft caramel brown (Meerkat).

Enjoy a colorful autumn!

Thank you for choosing your beads and findings @ http://dunebeads.com/en/ !

Happy day, see you soon!

LEARN and CREATE – the tubular herringbone weave on a base of ladder stitch - part 1

The herringbone stitch exists in several versions, among others:

  • a flat version,
  • a tubular version and
  • a twisted tubular version

and results in a sleek fish bone shaped pattern.

Traditionally, the tubular herringbone is build with an even number of beads, which may be increased and decreased, on a base round in ladder stitch. A necklace in herringbone weave can be worn as it is, be decorated or hold a pendant. The stitch is supple enough to be used for a bracelet or bangle and is fairly quickly created.

tubular herringbone

Challenge:

Although it is a relatively easy stitch, you need to pay special attention to the step-up and control the thread tension.

Supplies for the tubular herringbone stitch:

  • 8/0 beads or 3x3 mm fire-polished beads in 3 colors: color A, color B and color C
  • needle, thread and scissors
  • toggle and beading mat.

Weaving instructions for the regular tubular herringbone weave:

tubular herringbone - start in ladder stitch

  • to connect the end with the beginning go with the needle UP through the 1st bead and DOWN through the very last bead so that those beads sit next to each other and form a circle
  • to start the 2nd round, go back UP through the bottom of the 1st A bead
  • pick up 2x color A and go DOWN through the top of the next bead in color A

tubular herringbone - round 2 start position to add 2 beads

  • go UP through the bottom of the 1st color B

tubular herringbone - get in position to add 2nd color

  • pick up 2x color B and go DOWN through the top of the next color B

tubular herringbone - round 2 adding 2nd color

  • go UP through the bottom of the 1st color C

tubular herringbone - get in position to add 3rd color

  • pick up 2x color C and go DOWN through the top of the next color C

tubular herringbone - round 2, add 3rd color

SEE - part 2

LEARN and CREATE – the tubular herringbone weave on a base of ladder stitch - part 2

CONTINUATION: the regular tubular herringbone weave

  • as you can see, the beads in the same color form a column but sit slightly askew to form a herringbone pattern
  • **to start a new round, make a step-up by going UP through the 1st bead in color A on the same level, as well as through the A color on top of it

tubular herringbone - step-up to round 3

  • to summarize: in the step-up you work on 2 levels while in all the other cases you work only on 1 level
  • note: the step-up happens always in the 1st bead in color A and you add always 2 beads in the same color A
  • pick up 2x color A and go DOWN through the top of the next bead in color A

tubular herringbone - round 3, add 1st color

  • go UP through the bottom of the 1st bead in color B

tubular herringbone - round 3, ready for 2nd color

  • pick up 2x color B and go DOWN through the top of the next bead in color B
  • go UP through the bottom of the 1st color C
  • pick up 2x color C and go DOWN through the top of the next bead in color C**
  • continue **... ** till you have reached the desired length and stop after making a step-up

tubular herringbone - step-up for each round

  • note: initially there will be quite some distance between the three columns, but keep on going and with each round the columns will get closer together

tubular herringbone - columns

  • as the top beads stay relatively loose at the end, you will need to close the tube-shape before adding a toggle by going up and down through the thread path of the top rows

Hints:

  • for a thinner rope, work with a base of 4 beads or a smaller size beads
  • if you create a rope in a single color lay out little stacks of beads in advance, so you can easily see when you have reached the end of a round and have the make a step-up
  • you can also make short tubular herringbone pieces to use as individual beads
  • be creative and enjoy !

tubular herringbone stitch in fire-polished beads

Thank you for choosing your beads and findings @ http://dunebeads.com/en/ !

Happy day, see you soon!

LEARN and CREATE – the Russian Spiral Stitch or the “Collapsed” Tubular Netting Stitch - part 1

The Russian spiral is a variation of the netting stitch you used to create :

and consists of collapsed diamond shapes. As a consequence, the Russian spiral is supple and can easily be used to create bracelets and necklaces.

Russian spiral - golden blue

Challenge:

The use of faceted beads in three colors will make it easier to understand the structure, but you will have to pay special attention when adding the colors as they will vary in each round.

Russian spiral in three colors

Supplies for the Russian spiral rope:

  • 3x3 mm fire-polished Czech beads in three colors to create a smooth color wave: color A, color B and color C
  • suggestion: choose color B in 'stronger' more pronounced shade
  • 11/0 seed beads in a contrasting color to accentuate the spiral shape
  • needle, thread and scissors
  • toggle and beading mat.

Weaving instructions for the Russian spiral rope:

  • pick up 2x seed beads, 1x color A, 2x seed beads, 1x color B, 2x seed beads, 1x color C

Russian spiral - start

  • leave a generous tail thread of about 15 to 20 cm
  • create a circle by going back thru all the beads and continue moving on till the middle of the second pair of seed beads

Russian spiral - base

  • to summarize, go thru all the beads and thru the 4 following beads

Russian spiral - ready for round 2

  • round 2: pick up 1x color B and 2x seed beads and skip a seed bead and fire-polished bead to pass the needle thru the first seed bead of the next pair of seed beads in order to reach the middle of that pair of seed beads

Russian spiral - round 2, add color B

  • push the beads upwards and tighten your thread
  • pick up 1x color C and 2x seed beads and pass the needle thru the 1st seed bead of the following pair, this corresponds to the seed bead behind the fire-polished bead, to reach the middle of that pair of seed beads

SEE part 2

LEARN and CREATE – the Russian Spiral Stitch or the “Collapsed” Tubular Netting Stitch - part 2

CONTINUATION: the Russian Spiral Stitch

Russian spiral - round 2, add color C

  • pick up 1x color A and 2x seed beads and pass the needle thru the first seed bead behind the fire-polished bead

Russian spiral - round 2, add color A

  • check that you have lined up a fire-polished bead on top of the previous round in the same color, but slightly offset/diagonal
  • as you may notice, you always pick up the fire-polished bead in the color of the next bead beneath it
  • to access the next round, you will make an easy 2 bead step-up by going thru the next fire-polished bead and seed bead which are situated slightly higher

Russian spiral - step-up to round 3

  • notice also, that due to the step-up, you will skip a color in the series to start the next round, so check always that you pick up the color of the bead ahead
  • round 3: having reached the middle of a pair of seed beads, you pick up 1x color C and 2x seed beads and go thru the first seed bead of the next set

Russian spiral - round 3, add color C

  • pick up 1x color A and 2x seed beads and go thru the first seed bead of the next set
  • pick up 1x color B and 2x seed beads and go thru the first seed bead of the next set
  • make the step-up by going thru the next fire-polished bead and the seed bead behind it
  • up till now, you have applied the following color scheme for the fire-polished bead: A-B-C, B-C-A, C-A-B – you will repeat this scheme throughout your work

Russian spiral - color scheme

  • to start the 4th round, skip a color in the series and pick up 1x color A and 2 seed beads
  • the color scheme of the 4th round is identical to the one of the 1st round
  • to start the 5th round, skip a color in the series and pick up 1x color B and 2 seed beads
  • continue until you reach the desired length and stop after you made a step-up
  • attach a toggle with seed beads in three points of the top of the rope to center it correctly
  • and enjoy!

Choose your beads and findings @ http://dunebeads.com/en/czech-fire-polished-round-beads !

Russian spiral - spiral in seed beads and 3mm FP

Do not forget: practice makes perfect. Happy day, see you soon!

LEARN and CREATE – the flat brick stitch on a foundation of ladder stitch - part 1

For beginners, the great thing about the flat brick stitch is that it is easy and versatile. It has in common with the peyote stitch that it stacks the beads nicely on top of each other, especially if you work with Delica beads, but it differs in the following :

  • the bead's direction is vertical, meaning the hole of the bead is vertically and not horizontally lined up
  • the same stitch applies as well to an even number as an odd number of beads
  • the beads are attached by weaving your working thread around the thread of the preceding row, so you do not needle through the beads to affix them

and yes, you are right in thinking that this type of “wall” of bead-bricks needs a strong foundation, that is why you start with the ladder stitch and build up with the flat brick stitch.
Do not be scared off, whether you go through a bead or beneath and around a thread, in both cases the strength of your work depends on the sturdiness of the thread.

Brick stitch - adding a bead - side view

Challenge:

  • As your workpiece is held together by thread, controlling the thread tension will be paramount.

Supplies for a striped bracelet in flat brick:

  • 11/0 Delica beads in 3 colors: color A, color B and color C
  • OR 8/0 Japanese seed beads in 3 colors: color A, color B and color C
  • needle, thread and scissors
  • toggle and beading mat.

Weaving instructions for the ladder stitch:

  • the foundation in ladder stitch in color A: pick up and string two beads, leaving a generous tail thread to hold your work and stitch in later
  • hold the two beads side by side – top and bottom vertically - and pass back through the first bead, this is the one closest to the tail

ladder stitch - starting

ladder stitch - joining the first beads

  • to add a bead you have to go to the outer edge of the next bead and that is why you pass the needle down through the second bead

Ladder stitch - going to outer edge

  • pick up the next bead, hold the beads vertically side by side, pass the needle DOWN through the top of the previous bead and back UP through the bottom of the bead you added
  • as a consequence, you are forming a circle to attach each bead

Ladder stitch - adding a bead

ladder stitch - going to the edge

  • pick up the next bead, hold it side by side to the other beads and pass the needle UP through the bottom of the previous bead and back DOWN through the top of the bead you added

SEE - part 2

LEARN and CREATE – the flat brick stitch on a foundation of ladder stitch - part 2

CONTINUATION: the flat Brick Stitch

  • to summarize, depending the end position of your thread, you alternate and go down through the top and then up through the bottom OR up through the bottom and then down through the top
  • continue till you reach the desired width of your bracelet, in this case 7 beads
  • as you work with an odd number of beads, you end up with the tail thread facing down and the working thread facing up

Weaving instructions for the flat brick stitch:

  • round two: continue in color B, pick up a set of two beads and pass your needle beneath the thread in between the two beads below

Brick stitch - starting a row

  • pass your needle up the bottom of the second bead of the set you just added
  • note : you only add two beads at the initial of each round,

Brick stitch - getting on top

  • pick up a bead and pass your needle beneath the thread connecting the two beads below

Brick stitch - adding a bead

  • pass your needle up the bottom the of bead you just added
  • add a bead, pass your needle beneath the thread connecting the beads below
  • tighten your thread, pass your needle up the bottom of the bead you added
  • continue till the end of the row
  • round three: turn your piece and continue in color C, pick up a set of two beads, pass your needle beneath the thread connecting the two beads below
  • pass your needle up the bottom of the second bead of the set and tighten your thread
  • continue adding one bead at a time till the end of the row
  • round four: turn your workpiece and continue in color B
  • round five: continue in color A

Brick stitch on top of ladder stitch

  • play with the stripe pattern and possibly widen or change the stripes

Brick stitch for starters

  • if you work with bigger beads, you may want to firm the edges of your workpiece by circling back through the first and second bead you added
  • have fun !

Choose your beads and findings @ http://dunebeads.com/en/delica-seed-beads-size-11-japan !

Do not forget: practice makes perfect. Happy day, see you soon!