RSS

Blog

Spring and summer 2022 - la vie en rose or a bed of roses

When choosing between the soothing timeless colors and playful hues of the New York Fashion, you will without doubt be inclined to go for blues and/or pinks mixed with a classic touch of crisp white and grey or warm beige and brown.

Let us have a closer look at it :

  • From blue to green colors :

Spun Sugar - an airy pastel blue
Skydiver - a deep blue
Glacier Lake - a serene silver blue
Harbor Blue - a deep green-blue
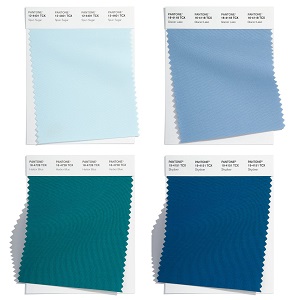
Spring and summer 2022 - from blue to green

  • From pink to purple :

Gossamer Pink - a soft powdery pink
Innuendo - a bright magenta pink
Dahlia - a vibrant purple pink and the middle ground between cool and warm colors
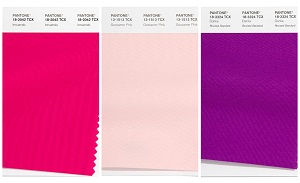
Spring and summer 2022 NY - from pink to purple

  • From yellow to brown :

Daffodil - a warm, bright yellow
Poinciana - an energetic orange red
Coca Mocha - a warm medium brown
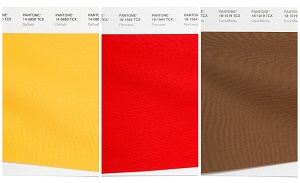
Spring and summer 2022 NY - from yellow to brown

  • The 2022 classic colors :

Whether it is a soft or a deep hue, all those timeless colors seem rather muted and cool this year.

Cool colors :

Snow White - a serene crisp white
Basil - a medium grey green
Northern Droplet - a pale grey
Poppy Seed - a deep grey

Warm colors :
Perfectly Pale - a pale sandy beige
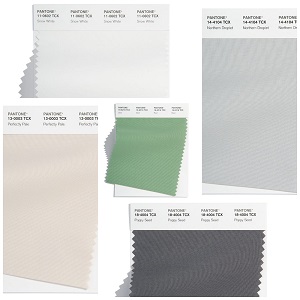
Spring and summer 2022 NY - classics

On the other hand, the London Fashion trend may be your alternative source of inspiration.  Here too, you find airy pastels, but then in combination with a different set of sparkling colors where the yellow - brown and green colors are more present.

The classic colors on the other hand, with the exception of the far more pronounced beige color and the paler green, are quasi identical to those of the New York Fashion trend.
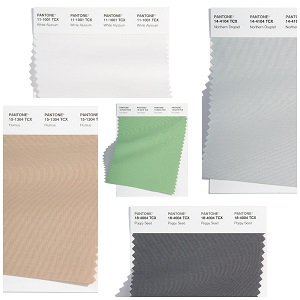
Spring and summer 2022 London - classics

Let us see :

  • From blue to green :

Super Sonic - a vibrant electric blue
Cascade - an aqua turquoise green
Fragile Sprout - a vivid yellow green
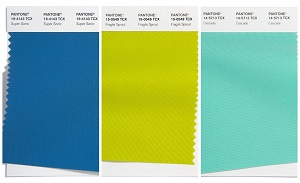
Spring and summer 2022 London - from blue to green

  • From pink to purple :

Potpourri - a muted pastel pink
Bubblegum - a bright, cheerful pink
Orchid Bloom - a light lavender pink
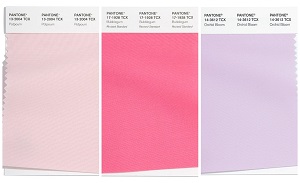
Spring and summer 2022 London - from pink to purple

SEE - part 2
Spring and summer 2022 - la vie en rose or a bed of roses - part 2
CONTINUATION - la vie en rose or a bed of roses

  • From brown to yellow :

Coral Rose - a deep muted orange
Popcorn - a warm vanilla yellow
Sudan Brown - an earthy ochre brown
Coffee Quartz - a deep, warm brown

Spring and summer 2022 London - from  yellow to brown

Most notable for spring and summer 2022 is the strong presence of pink - purple in both fashion trends.

Have a wonderful creative time with dunebeads.com!

LEARN and CREATE – the Autumn and Winter 2020-2021 Color Pallet

The Pantone colors for this autumn and coming winter reflect the mindset of a classic minimalism mixed with the current color aesthetics in response to our chaotic world.

Pantone's answer, an almost Zen-like integration of nature in color, encourages us to do more with less, to opt for timeless bold elegance to express our uniqueness. Pantone somehow presents a balance between cold and warm colors as well as light and deep tones.

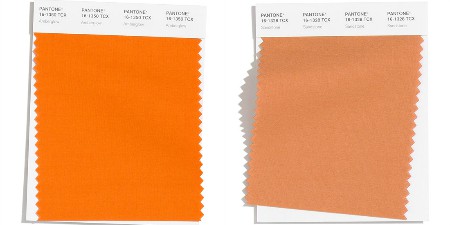
Orange to brown colors:

  • Amberglow: a warm and luminous orange to celebrate autumn
  • Sandstone: a more muted and warm woody orange

Pantone 20-21 - orange to brown

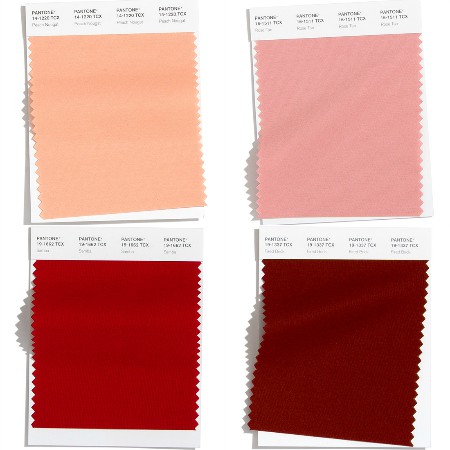
Pink to red colors :

  • Rose Tan: a dusky elegant, cool pink
  • Peach Nougat: a warm chic peachy pink
  • Samba: a deep sensual daring red
  • Fired Brick: a more neutral glamorous red

Pantone 20-21 - pink to red

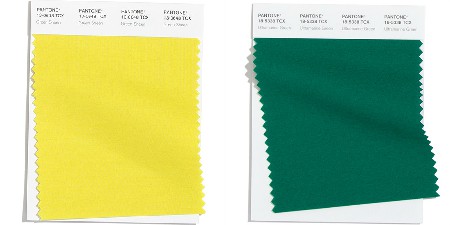
Yellow to green colors:

Green Sheen: an intense lemon yellow with a green undertone
Ultramarine green: a deep cool green color

Pantone 20-21 - yellow to green

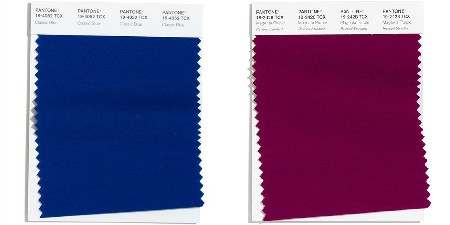
Blue to purple colors:

  • Classic blue: a strong unisex and timeless blue that is very much the color of 2020
  • Magenta purple: a deep eye-catching red purple

Pantone 20-21 -  blue to purple

The Classics:

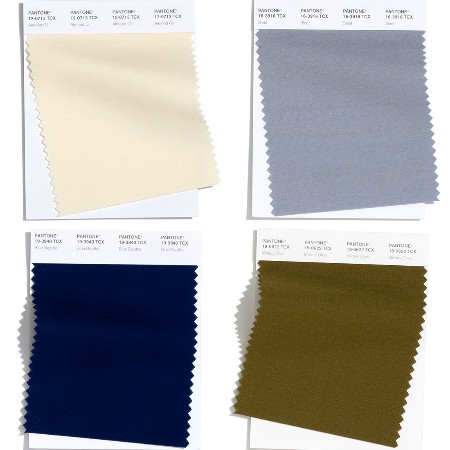
  • Almond Oil: a neutral subtle creamy off-white
  • Blue Depths: a deep saturated navy blue
  • Sleet: a neutral medium grey, chic and timeless
  • Military Olive: a warm, deep shade of yellow green

Pantone 20-21 - the classics

For our color combination ideas, follow us @ https://www.facebook.com/dunebeads

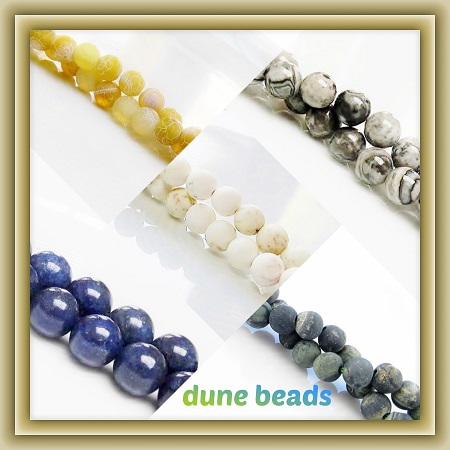
Pantone 20-21 - blog - crackle agate, picasso jasper, magnesite, kambamba jasper, lapis lazuli

Enjoy a wonderful creative time with https://dunebeads.com/ !

LEARN and CREATE – the “Two Seasons” bracelet

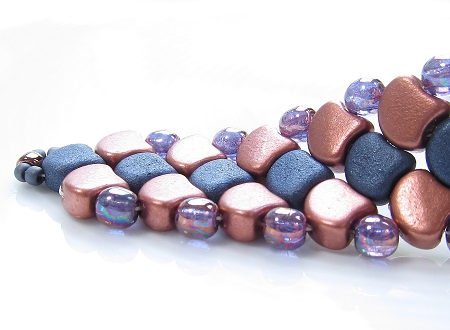
Enjoy the summer and a lovely simple stringing project ... with a WOW effect ... in Ginkgo leaf beads. The Ginkgo, a huge non-flowering tree, is the only living species of its division and has unusual fan-shaped leaves. This attractive leaf in vivid green is the symbol of Tokyo (Japan), but is mostly known for its striking yellow beauty. By the way, the Ginkgo can live up to a thousand years. Have fun with your “Two Seasons” bracelet!

two seasons bracelet

Challenge:

No previous knowledge is necessary. To maintain the bracelet's flexibility, do not tighten the thread too much.

Supplies for the «Two Seasons» bracelet:

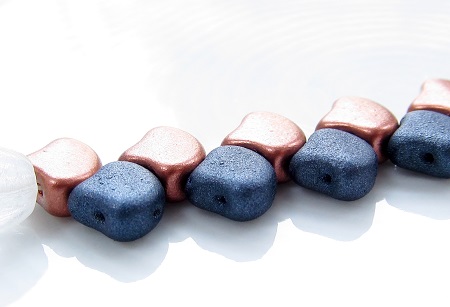
  • 7,5x7,5 mm Ginkgo beads in two colors: color A and color B
  • 4x4 mm round pressed Czech beads (druk beads)
  • 11/0 Toho seed beads
  • 8/0 Japanese seed beads (2,5 mm)
  • polyethylene thread (fishing line or Fireline) and James John needle #10
  • toggle clasp or lobster clasp
  • scissors and a bead mat

Weaving instructions for the «Two Seasons» bracelet:

  • cut off a comfortable length of thread and keep about 15 to 20 cm tail thread
  • string on a stop bead and make a few passes through it
  • to calculate the number of beads of the setup, take into account the size of your bracelet and double the number
  • example: for a 16 cm bracelet, you need to string 38 beads; for a 18 cm bracelet you need 40 Ginkgo beads
  • note: do not forget to take the size of your clasp in account
  • choose always an EVEN TOTAL of Ginkgo beads to fill out the first two rows (similar to the Peyote stitch start)
  • example: for a 16 cm bracelet you need 19 beads of color A and 19 beads of color B for the first two rows (or 38 Ginkgo beads if you use only one color)
  • in other words, one color A for the outside row and one color B for the inside row
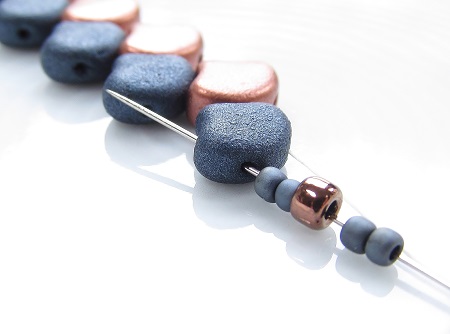
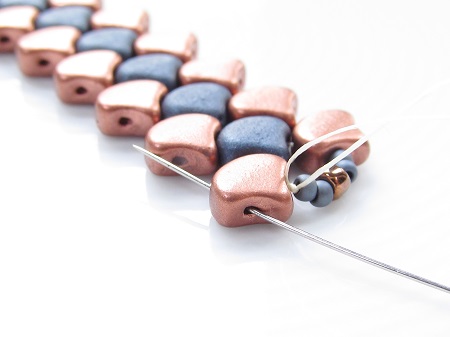
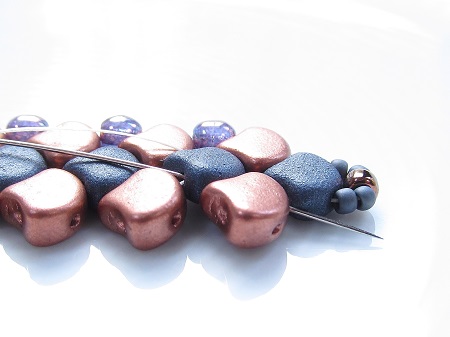
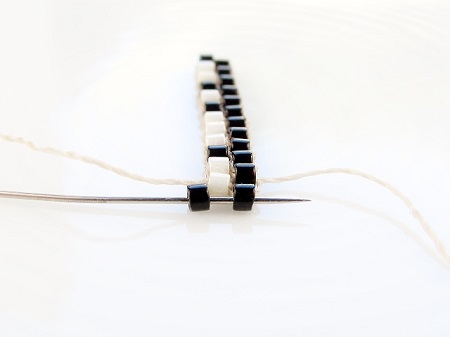
  • string alternately one bead in color A and one bead in color B with the tip of the bead towards your stop bead and range them along the middle line
  • as a consequence, the leaf beads fit snugly one into the other

two seasons bracelet - start, stringing

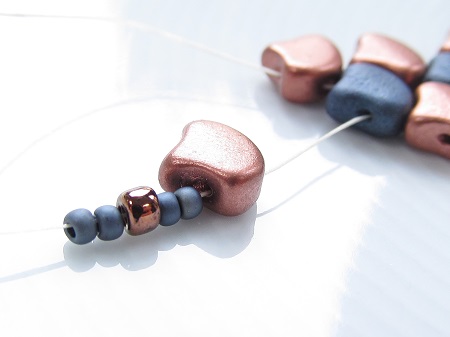
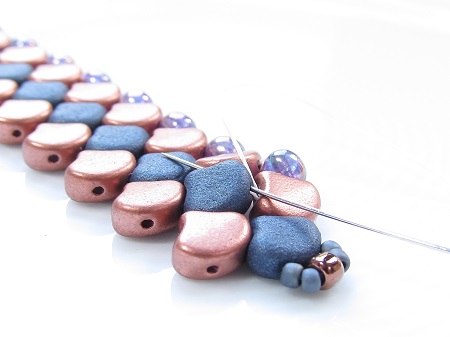
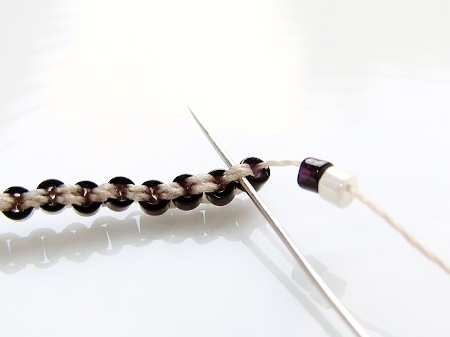
  • to make a U-turn and go to the next round: pick up two 11/0 seed beads, one 8/0 seed bead and two 11/0 seed beads and go down through the next hole of the last Ginkgo bead

two seasons bracelet - turn for row 3

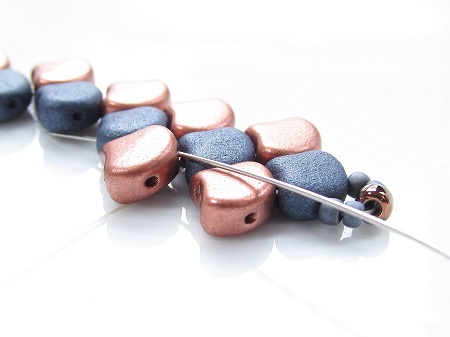
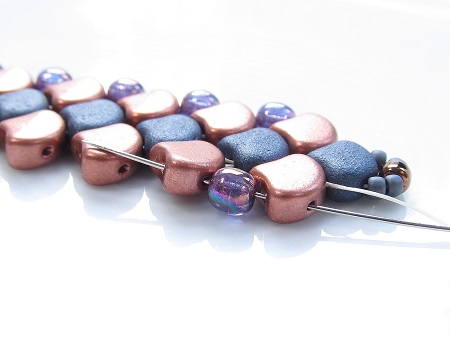
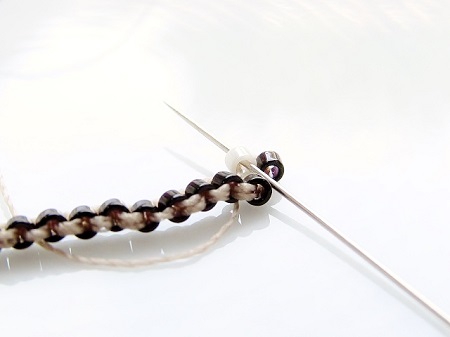
  • pick up one Ginkgo leaf in color A and go through the outer hole of the next leaf
  • repeat until the end of the row

two seasons bracelet - add 3rd row of ginkgo beads

  • remove the stop bead
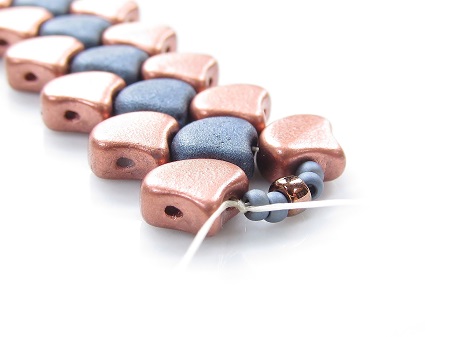
  • to finish the row, pick up one Ginkgo beads in color A, two 11/0 seed beads, one 8/0 seed bead and two 11/0 seed beads and tie the working thread and the tail thread together

two seasons bracelet - 2nd turn to go to round 4

two seasons bracelet - knot tail and work thread together

  • do not tighten the threads too much in order to keep the bracelet's flexibility

SEEPart 1

LEARN and CREATE – the “Two Seasons” bracelet - part 1

CONTINUATION

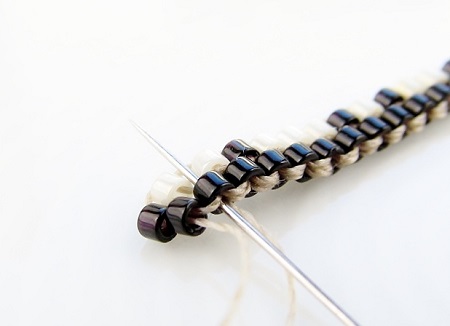
  • make an outside U-turn by passing your needle through the hole on the outside of the Ginkgo bead in the color A

two seasons bracelet - ready for round 4

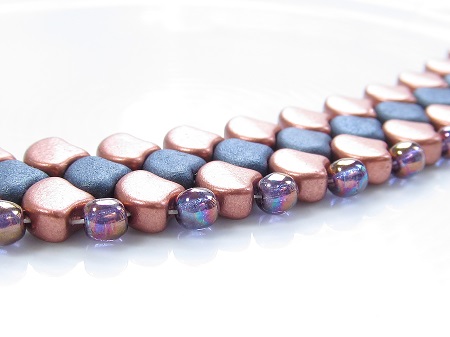
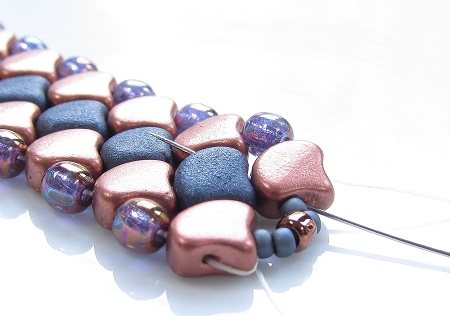
  • fill out the gaps between the outer edges of the Ginkgo leaves with 4x4 mm round beads

two seasons bracelet - round 4, add 4 mm druk beads

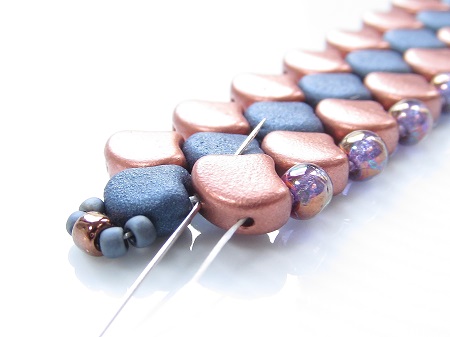
  • to switch sides at the end of the row, you will go up and down through the inside rows as follows:
  • pass your needle DOWN through the hole on the outer side of the same leaf bead as well as through the following hole of the next leaf

two seasons bracelet - U-turn 1 - down, bead 1

two seasons bracelet - U-turn 1 - down, bead 2

  • and go with your needle UP through the hole on the outer side of the same leaf bead as well as through the following hole of the next leaf bead

two seasons bracelet - U-turn 1 - up 2 beads

  • arrived at the top, pass your needle down through the hole on the outside of the Ginkgo leaf
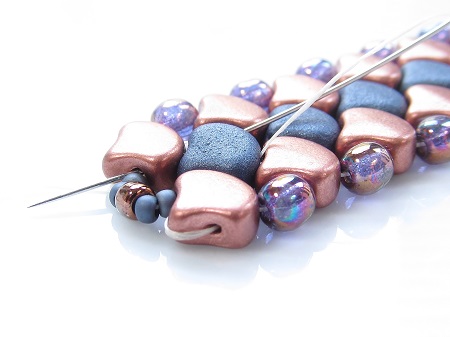
  • fill out the gaps between the outer edges of the leaves with 4x4 mm round beads

two seasons bracelet - complete turn and add 4 mm druk beads

  • arrived at the end, you will go up and down through the inside rows in order to join the tail thread as followed:
  • pass your needle DOWN through the hole on the outer side of the same leaf bead as well as through the following hole of the next leaf bead

two seasons bracelet - U-turn 2 - down

  • and go with your needle UP through the hole on the outer side of the same leaf bead as well as through the following hole of the next leaf

two seasons bracelet - U-turn 2 - up

  • make a knot with both threads
  • attach the clasp of your choice
  • weave your threads into your work piece while adding a few half-hitch knots
  • enjoy!

SEEpart 2

LEARN and CREATE – the “Two Seasons” bracelet - part 2
CONTINUATION

Suggestion:

  • you could use a short version of this design as a centerpiece of a bracelet and complete it with a leather strap
  • the original version is in one color to mimic a mermaid tail

We used the following beads:

two seasons bracelet


Note: the original “Mermaid bracelet” from Nela Kábelová is distributed in English by Beadsmith and has been annotated for complete beginners by dune beads

Thank you for choosing your beads and finding @ https://dunebeads.com/en/ !

Happy day, see you soon!

LEARN and CREATE – starring your creation in brick stitch

To start from scratch, it is best to get used to working with Excel to develop your own graph and create your very own masterpiece in brick stitch … the sky is the limit. Have fun!

brick stitch from scratch - creating

Starting a graph in Excel:

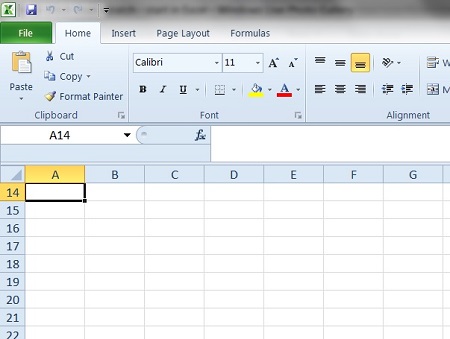
open an Excel document and change the dimensions of the cells as follows:

  • at the top, click on “Home” which is next to “File”
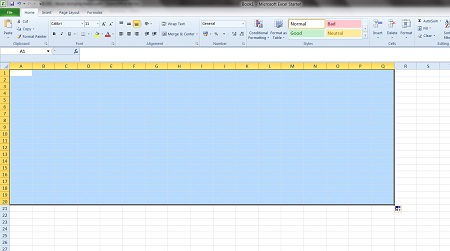
  • click on the first cell at the top and drag the handle (the dot at the bottom) horizontally from A to Q and vertically from 0 to 20

brick stitch from scratch - starting in Excel

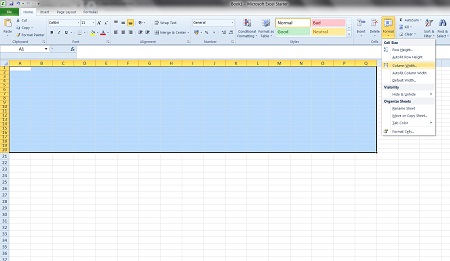
  • this working space will turn blue

brick stitch from scratch - create a field

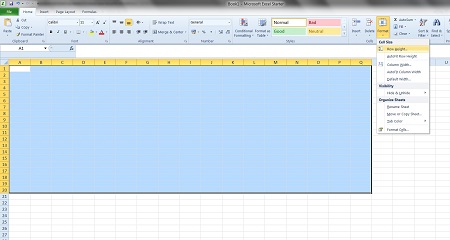
  • click on “Format” and choose under “Cell size” the box “Row height”

brick stitch from scratch - choose your row height

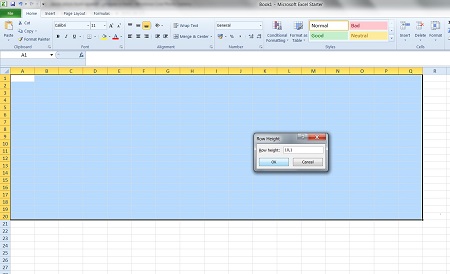
  • a little window appears where you can change the default height
  • fill in "10,1" and confirm

brick stitch from scratch - fill in the row height

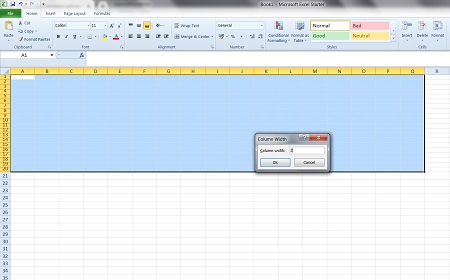
  • click again on “Format” and choose “Column width”

brick stitch from scratch - choose your column width

  • when the little window appears, fill in “2” and click “ok”

brick stitch from scratch - fill in the column width

  • click anywhere in your document and your empty graph will appear
  • if necessary you can change more rows and columns later on by repeating the above

Creating fictitious beads:

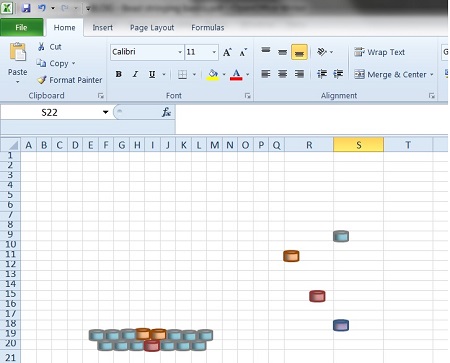
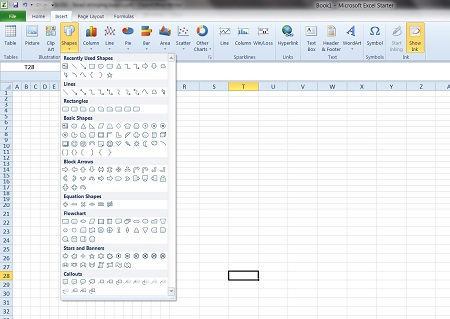
  • click on “Insert” which is next to “Home”
  • click on “Shapes”
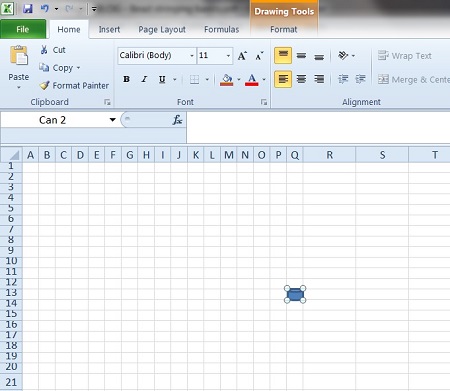
  • and choose a “Can” shape under “Basic shapes”

brick stitch from scratch - choose a can shape

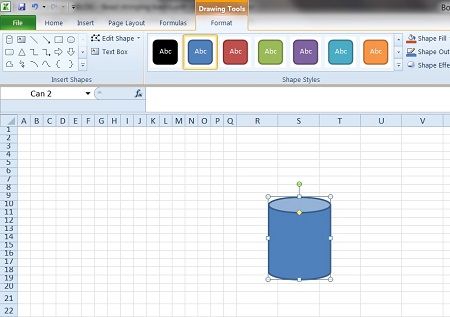
  • click on the page and a cylindrical shape appears

brick stitch from scratch - the can shaped bead

  • to format the over-sized bead so it fits your graph: click on the cylinder and adapt its size by moving the cursors, first the side and then the top and bottom till it fits a cell

brick stitch from scratch - the bead

SEE- part 2
LEARN and CREATE – starring your creation in brick stitch - part 2
CONTINUATION

Give your beads a color:

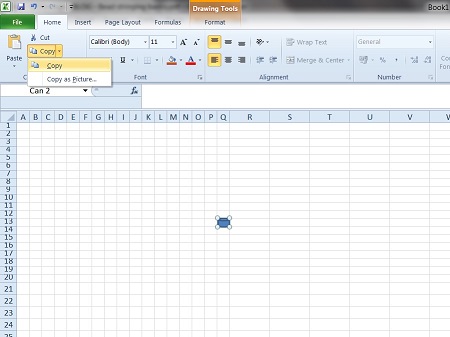
  • to multiply the number of beads, go to “Home”
  • click on the “bead”, choose “copy” and “paste”
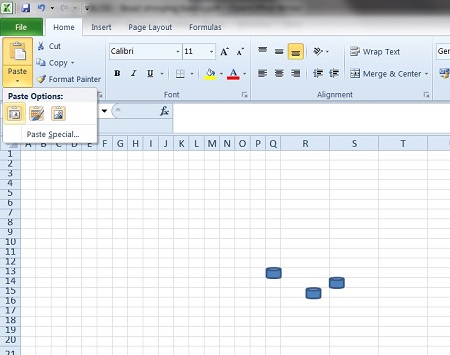
  • click on a cell in your field so it can appear

brick stitch from scratch - copy the bead

  • click as many times as you wish on “paste” to add a bead in a cell

brick stitch from scratch - multiply the bead

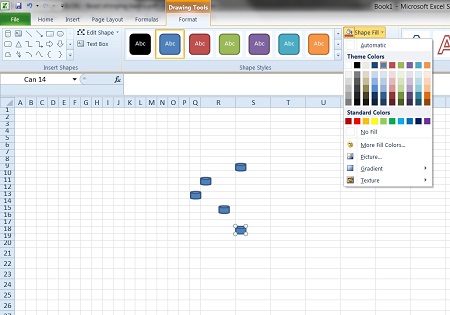
  • when you click on a bead, “Drawing Tools” with underneath the mention “Format” will appear at the top
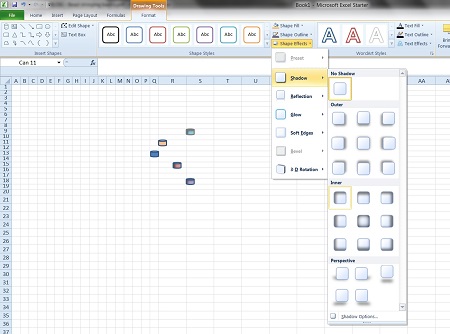
  • there are options to change: the shape fill (color), the shape outline (color) and the shape effects (shadow, ...)

brick stitch from scratch - give the beads a different color

brick stitch from scratch - give the beads a different color, change the outline and add a shadow

  • have fun and choose the bead colors

Give your creativity wings:

  • copy and paste the colored beads in your graph
  • for the brick stitch, do not forget to put the beads in the cells in one row and put the beads in between the cells in the next row

brick stitch from scratch - creating

Get supplies for “Your Design”:

  • choose 11/0 Delica beads for a flat surface or seed beads a more rounded appearance
  • polyethylene thread (fishing line or Fireline)
  • James John needle #10 or #12
  • scissors and a bead mat

Start beading:

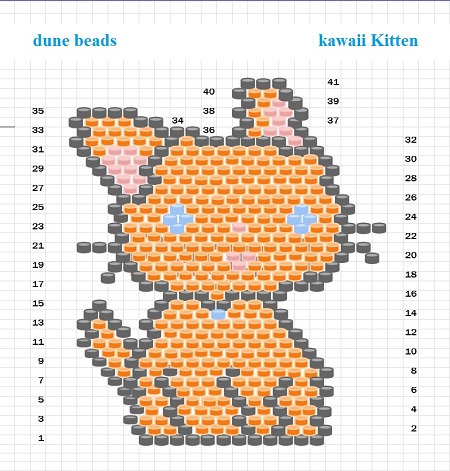
Chart, Kawaii Kitten

Thank you for choosing your beads and finding @ dunebeads.com/en/!

Happy day, see you soon!

LEARN and CREATE – the « Kawaii Kitten », an element in brick stitch

With the brick stitch, it is really easy to increase and decrease and to create different shapes. The visual difference between the brick and the peyote stitch sits in the direction of the beads: in the first the beads lay vertically, while in the second they lay horizontally. As the brick stitch has a natural tendency to decrease, this little element will learn you different ways to increase. You can use the « Kawaii Kitten » as a pendant or a keychain pendant.

Challenge:

In the brick stitch the right thread tension is really important to ensure the beauty of your needlework. Neither too tight, nor too loose will do well.

Supplies for the «Kawaii Kitten»:

  • 11/0 Delica beads in four colors: Delica A (outline), Delica B, Delica C (details), Delica D (details)
  • polyethylene thread (fishing line or fireline)
  • James John needle #10 or #12
  • scissors and a bead mat

Chart, Kawaii Kitten

Weaving instructions for «Kawaii Kitten»:

  • cut off a comfortable length of thread
  • create a base row in ladder stitch
  • pick up 2x Delica A and circle back through the 1st Delica
  • pass your needle through the next bead
  • note : the 2 Delica's sit next to each other
  • to secure your beads: circle up and down through every bead once more till you get to the other side
  • you end up opposite the tail thread
  • *pick up 1x Delica A, circle back through the last bead
  • pass through the bead you just added to get in place for the next bead
  • go back through the previous bead as well as through the bead you added**
  • repeat *...** nine more time to line up 12 beads
  • note : with each bead you add, your thread ends up in the opposite direction of the previous position
  • pictures and beginner's guide - https://dunebeads.com/en/learn-and-create-the-flat-brick-stitch-on-a-foundation-of-ladder-stitch-part-1
  • continue in brick stitch:
  • note: in the brick stitch you attach the beads by passing your needle underneath the thread in between 2 Delica's of the previous round
  • remember: to finish a thread or add a new thread, go with your needle diagonally through your work piece and add some half hitch knots
  • 2nd round: pick up 1x set Delica A + Delica B (or a total of 2 beads)
  • pass your needle underneath the thread between the 2 Delica's of the previous round

Kawaii Kitten - round 2, start brick stitch

Kawai Kitten - round 2, attach a set of beads

  • go with your needle up through the 2nd bead you just added
  • note : you increased the number of beads
  • to add another Delica B, pass your needle underneath the thread in between the next set of Delica's
  • and go up through the bead you just added
  • continue in the same way and add 1x Delica A, 1x Delica B, 1x Delica A, three times 1x Delica B, 1x Delica A, 2 times 1x Delica B
  • make another increase and pick up 1x Delica A, go with your needle DOWN through the last bead of the previous round and Up through the previous bead of that round

SEEPART 1

LEARN and CREATE – the « Kawaii Kitten », an element in brick stitch - part 1

CONTINUATION

Kawaii Kittin - round 2, increase end of row

Kawaii Kitten - round 2, attach increase

  • to get in place for the next round, go with your needle up through the last bead of the last round

Kawaii Kitten - round 2, in place for round 3

  • in brief, in the 2nd round you added: 1x set Delica A + B, 1x Delica B, 1x Delica A, 1x Delica B, 1x Delica A, three times 1x Delica B, 1x Delica A, two times 1x Delica B, 1x Delica A
  • 3rd round: start with an increase and pick up 1 set Delica A + Delica B
  • pass your needle underneath the thread in between 2 Delica's of the previous round
  • go UP through the last bead you just added
  • to add another Delica B, pass your needle underneath the thread in between the next set of Delica's
  • and go up through the bead you just added
  • complete the round as follows: 1x Delica A, three times 1x Delica B, 1x Delica A, two times 1x Delica B, 1x Delica A, 1x Delica B, 1x Delica A
  • note : at the end of the row you do not make an increase
  • 4th round: start with an increase and pick up 1 set Delica A + Delica B
  • pass your needle underneath the thread in between 2 Delica's of the previous round

Kawaii Kitten - round 4, start increase

  • go UP through the last bead you just added
  • to add another Delica B, pass your needle underneath the thread in between the next set of Delica's
  • and go up through the bead you just added
  • complete the round as follows: 1x Delica A, 1x Delica B, 1x Delica A, four times 1x Delica B, 1x Delica A, 1x Delica B, 1x Delica A
  • the 4th round consists of 13 beads
  • 5th round: start with an increase and pick up 1 set Delica A + Delica B
  • pass your needle underneath the thread in between 2 Delica's of the previous round
  • go UP through the last bead you just added
  • to add another Delica B, pass your needle underneath the thread in between the next set of Delica's
  • and go up through the bead you just added
  • complete the round as follows: 1x Delica A, three times 1x Delica B, 1x Delica A, 1x Delica B, 1x Delica A, two times 1x Delica B, 1x Delica A
  • 6th round: pick up 1 set Delica A + Delica B
  • pass your needle underneath the thread in between 2 Delica's of the previous round
  • go UP through the last bead you just added
  • continue adding in brick stitch: 1x Delica B, 1x Delica A, two times 1x Delica B, 1x Delica A, three times 1x Delica B, 1x Delica A, 1x Delica B, 1x Delica A
  • make another increase: pick up 1x Delica A, go with your needle down through the underlying Delica, up through the previous bead and in diagonal up through the last bead you added
  • note: you added 14 beads in this round
  • 7th round: 1 set Delica A + Delica A, 1x Delica B, 1x Delica A, three times 1x Delica B, 1x Delica A, three times 1x Delica B, 1x Delica A, 1x Delica B, 1x Delica A

SEEPART 2